
Search This Supplers Products:kart partsscooter partsatv partsutv partscustomized partsgo kart parts
- Home
- About us
- Products
- Accessories
- Air Oil Filters
- Axles/Bushing/Hub
- Agriculture/Garden Parts
- Brakes and Accessories
- Bearing
- Clutches
- Clutch pulley
- Carburettor & Parts
- Chain & Parts
- Custom parts
- Drive Belt
- Engine & Parts
- Engine Roller
- Fuel Tanks, Pumps, and Parts
- Foot Pedals
- Gear
- Gear Box
- Handle Accessories
- Light
- Shaft
- Steering Wheel
- Sprockets
- Shocks & Springs
- Switches
- Tools
- Wheels and Rims
- Others
- Seat & Seat Belt
- Linear Actuator
- Faqs
- News
- Certificate
- Contact us
GO KART STEERING SYSTEM: PARTS, DESIGN & BUILD
time2017/01/10

GO KART STEERING SYSTEM: PARTS, DESIGN & BUILD
Go Kart Steering
Go kart steering can be complex, overwhelming, and a source of major problems if you don’t build your go kart correctly. Luckily, I have reviewed many different go kart steering designs and will show you how the go kart steering works. With input from acquaintances in the go karting industry, I have selected the simplest, easiest method to build a heavy duty, and reliable go kart steering system with all of the parts you need. So lets build your own DIY go kart steering system.
Go Kart Steering Kit Parts Breakdown
There are the parts you will need to buy, and there are the parts you can build from scratch or purchase from a hardware store. The go kart steering parts that came with the whole go kart build kit that I got can be purchased in the above link, and are are listed below:
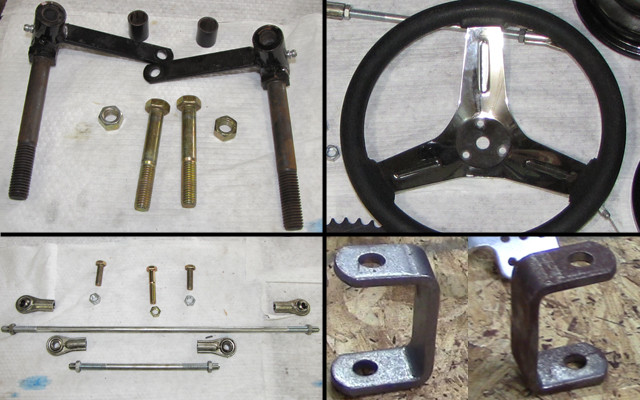
10 inch go kart steering wheel
3/8 inch x 8″ tie rod with tie rod ends
3/8 inch x 18″ tie rod with tie rod ends
(2x) 3″ tall spindle brackets with 1/2″ kingpin holes
RH & LH (right and left hand) spindles
Kill switch (it mounts to the steering hoop)
The parts of the steering system assembly are part of the free go kart steering plans that I offer at KartFab.com. The go kart steering components that I had to buy at a hardware store, or design, cut, and build are as follows:
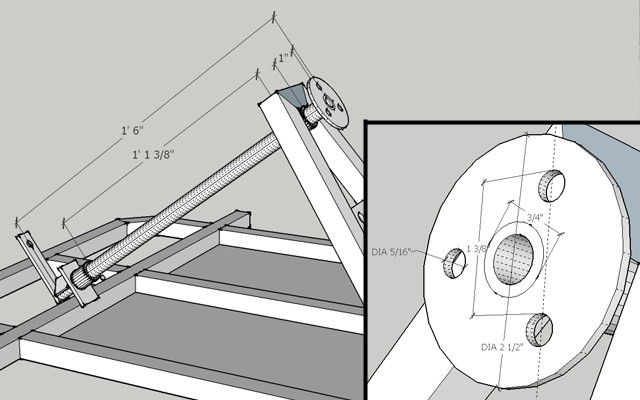
Steering Column
11ga. 18″x3/4″ OD tubing for the steering shaft
Steering wheel hub made from a 2 1/2″ OD flat washer
(2x) 3/4″ID (1″OD)bushings (a.k.a spacers or sleeves) to hold the steering shaft in place under the steering hoop as well as against the lower bracket

Lower Bracket, Steering Stop & Pitman Arm
3/16″ plate was used to make the lower bracket and pitman arm
1″x1″x1/8″ thick angle iron was used for the steering stop
Steering Hoop & Kill Switch
11ga 1″x1″ square tubing
3/16″ thick kill switch plate
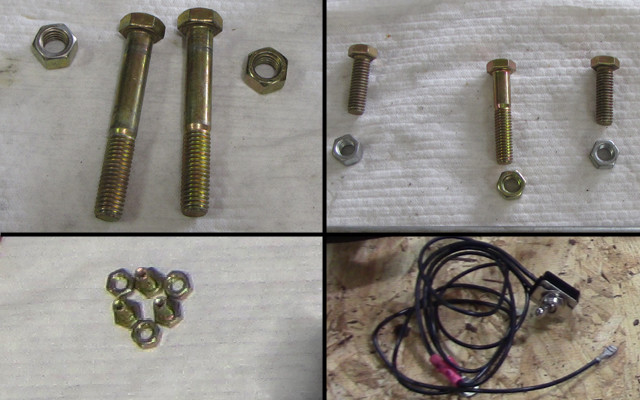
Steering Component Hardware
(2x) 1/2-13 x 3 1/2″ bolt used as the kingpin bolts on the spindle brackets
(2x)1/2-13 nut used to secure kingpin bolts to spindle brackets
(2x) 3/8-16 x 1″ bolts used to secure tie rod ends to spindle arms
(1x) 3/8-16 x 2″ bolt used to secure pitman arm to tie rod ends
(3x) 3/8-16 nuts to secure bolts to tie rod ends
(4x)1/4-20 x 1/2″ bolts secure steering wheel to hub and the kill switch ground to the kill switch plate on the steering hoop
(2x) 5/8″ ID x 1″ spacers for spindles to space out the rims

How to Make Go Kart Steering: Assembly
Building a go kart steering system is really easy with the plans that I have provided. Just follow the step-by-step instructions and diagrams in the plans, drill and cut out the steel, and weld it up. I have attached the diagrams as pictures here for reference, but you can get larger diagrams in the PDF go kart plans (opens PDF in new window). Here are the steps I created for DIY go kart steering:

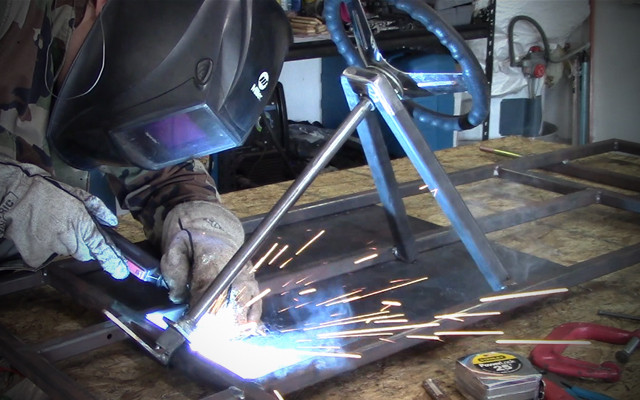
Steering Hoop: Cut out and weld the steering hoop on a flat surface. The angles were cut on 51° read from a protractor (reads as 39° from an abrasive chop saw). You should also cut out and drill holes for the kill switch plate. Weld the kill switch plate onto the steering hoop. When tacking the steering hoop to the frame, you should shoot for about a 55° slant.

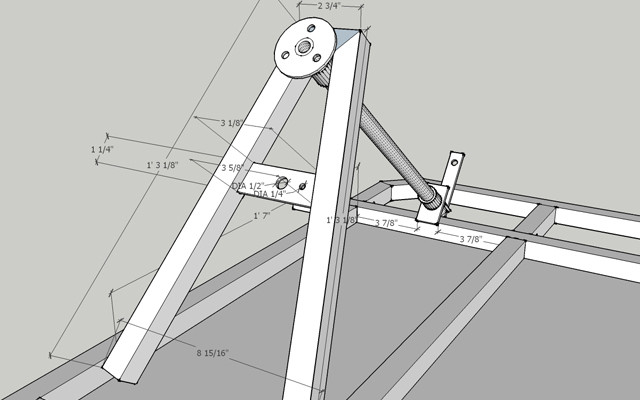
Steering Shaft: Drill holes in the steering wheel hub, and weld it flush with the steering shaft (make sure you have the steering wheel symmetrical on this step). Slide the two spacers onto the shaft, drill a 3/4″ hole in the lower bracket that will be welded to the kart. Weld the angle iron (steering stop) and pitman arm (with 3/8″ hole) onto the shaft as well. The lower bracket should have just enough play between the spacer and steering stop to spin freely on the steering shaft without binding.

Weld Shaft to Hoop: Once the hoop and column are complete, it is time to permanently attach them to the kart. Again, the hoop should be about at a 55 degree angle from the horizontal frame. Make sure the 3/4″ID spacer on the steering shaft has some wiggle room, then tack it. If it is a tight fit, welding will make it warp and bind to the shaft. I ground down part of the steering column so it would have enough wiggle room before welding.

Weld the Lower Bracket to the Frame: Tack weld the lower bracket first, then check the steering angle. Make sure that the pitman arm travel is limited so that the go karts steering angle turns no more than 45 in either direction from straight up. ‘Straight up’ is when the pitman arm points straight up, and the wheels are both pointing forward. I used my angle finder to determine how high to tack the lower bracket that holds the steering column. The angle iron should contact the frame and prevent you from over steering.

Weld Spindle Brackets to the Front Axle: The spindle brackets that came in the go kart parts kit should be tack welded near 90°, roughly centered on the go kart’s front axle. There is minimal room for error here, so please attach the tie rods and spindles just to make sure they (the tie rods) don’t contact the bumper before you fully weld the spindle brackets to the axle.

Attach Tie Rods, Spindles, and Steering Wheel: The tie rods in the above picture and spindles should be bolted onto the kart. Tighten the kingpin bolts (the bolts that hold on the spindles) just tight enough that they don’t bind to the spindles.

Go Kart Steering Design
Building a go kart steering system is easy with the design I used. This system includes the wheel, column, steering stops and brackets, which then attach to the pitman arm, tie rods, spindles, and spindle brackets. This reliable design has stood the test of time and needs minimal servicing. This kart is functional, simple, and heavy duty. You will get many years of enjoyment out of it.